i’ve been thinking of starting a sewing tutorial site/blog thing. since i’m not selling clothes anymore, why not? back in the day people were always bugging me for tutorials anyway. & it seems sort of fun. what do you think? would you be interested in this? & is there anything specific you’d want to know?
i was sewing this week & i thought i’d start with the dress i was working on. this includes in-seam pockets, a blind zipper, flutter sleeves & some general stuff.
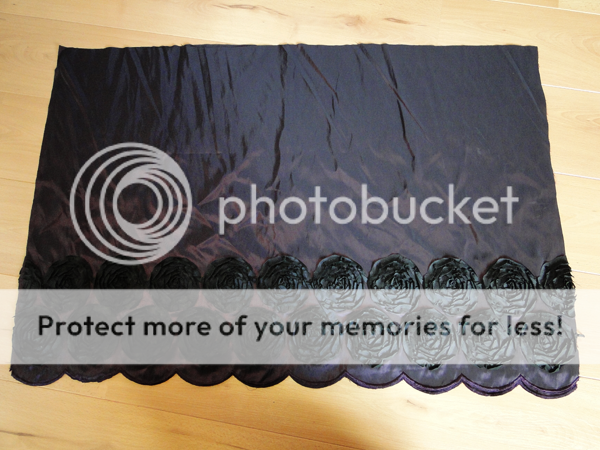
the dress in question:


i love it so much! i think it’s my new favourite. it has all my current loves in it. taffeta, dark purple, good quality lace, large pockets, roomy but not too wide skirt, over the knee length, that sophisticated gothic feel ^-^ perfection. i really love the trim of that taffeta fabric too. i was planning a completely different skirt, but that trim more or less forced me into this ruffled one & it turned out splendidly.
i really took my time with this, made it over the course of three days. i should take my time more often.
on to the walk-through.

these were the pattern pieces i used. all are half. i drew the one for the bodice from a vintage dress & the other one from a regular t-shirt that fit well. both drawn a very long time ago & used very, very often. the piece on the bottom right is for the pockets, just a large blob drawn around my hand with a flat side for the opening. if you’re going to draw a pattern that you plan on using often, you probably shouldn’t do it on the standard pattern paper. observe the many holes & tears. it’s better to use the kind of paper you wrapped your schoolbooks in.

the skirt is just a rectangle, no pattern needed. the height of this one was 70 cm, with 1 cm seam allowance, & 2 meters wide.
the first thing i did, after cutting the fabric, was pin & sew the bodice together. TIP OF A LIFETIME: if possible, stick the pins in horizontally, not parallel to the seam, it will be MUCH easier to sew. i am forever thanking my old sewing teacher for that simple, little tip.

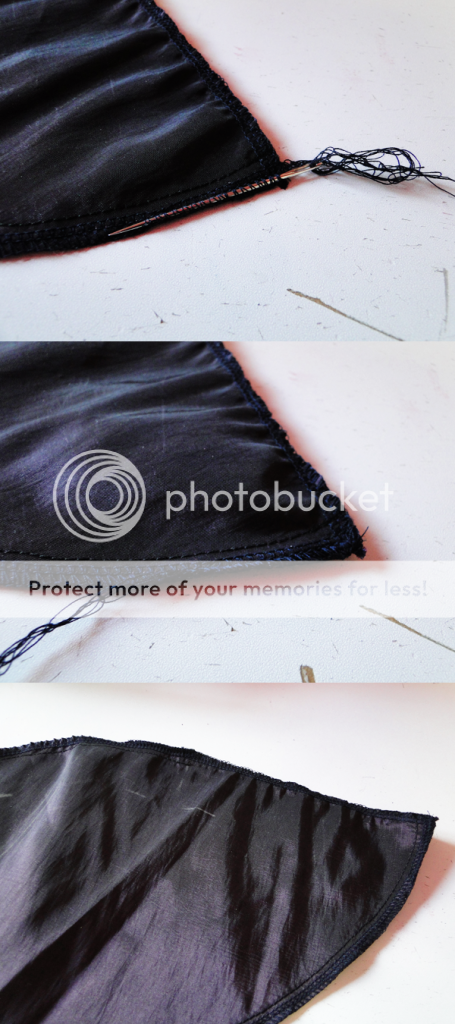
i left the right side of the bodice open, for the zipper. then i serged all the seams & the open sides.
then i went on to the pockets. serged the flat sides where the opening would be separately. then i sewed & serged the pockets together.

oh, & how i finish off serged seams is by pulling the tail through the last stitches & cutting the remainder off, in case you were wondering. see? all neat & finished.

once the loose pockets were done, i serged the edges of both skirt parts separately & then pinned them together. i marked where i wanted the pockets & zipper to be. (my pockets were 15 cm down from the waist) those parts i skipped over when sewing the skirt together. i sewed along the top side of the skirt as well, with the largest stitch size & leaving long threads at the ends, for the gathering later. since pockets would come in the seams, i folded those open, as opposed to folding them on one side.


then sewing the pockets in. this is a little tricky, but probably a lot easier than it looks. first i turned the pockets inside out. or rather, outside in. then i inserted them into the openings in the skirt from the outside. then i pinned the edges together on the inside. then it was just a matter of sewing them together, from top of the pocket to bottom, each side of the openings separately. there is no sewing a pocket like this is one neat round.

after that all that was left to do was pull the pocket inside. & there you have two perfect in-seam pockets.

gathering the skirt was next. another reason to love taffeta is how easy it is to gather. it went so smoothly, it was lovely. if you don’t know how to gather fabric, basically you just have to pull one of the loose threads of your seam, while gently pushing your fabric in the other direction. it’s very easy, you’ll know what to do. just be careful that you don’t break the thread.

i pinned the skirt side-seam to the bodice side-seam & open sides to open sides, then i pinned the rest in-between as i adjusted my gathers. it’s easier & more even that way.

sewed & serged it & this was what i had so far.

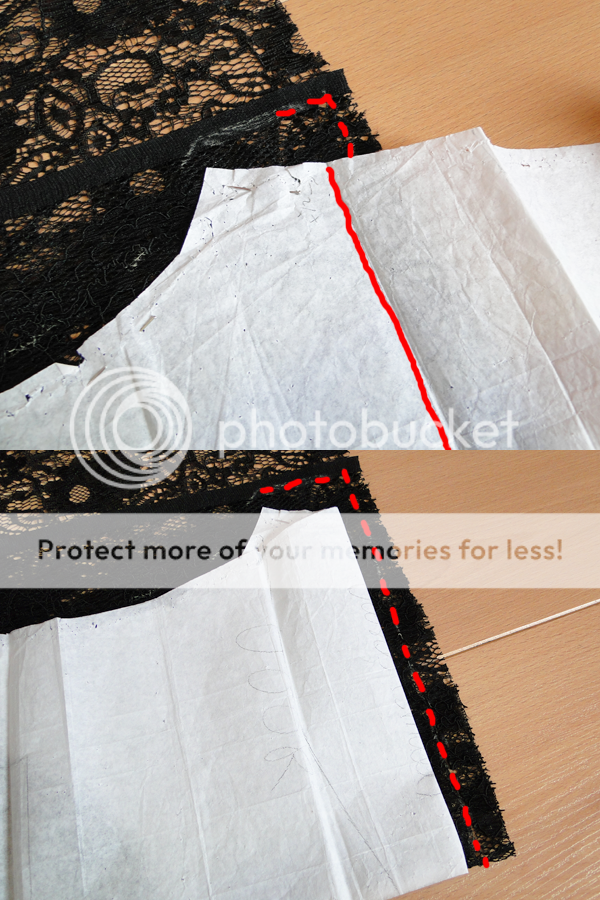
then the lace yoke. before you read any further, you should know that there is probably an easier, more practical way to do this. this is what i taught myself & what has worked for me, so far. on the basic shirt pattern i arranged the bodice pieces, from the waist up, & traced around the top.

if i was going to make this specific bodice & stretchy yoke thing more than once, i would have drawn new pattern pieces for the yoke, but since i wasn’t this was easier, for me. the pattern of the unstretchy bodice was slightly wider than of the stretchy shirt, so i drew the difference on the fabric, plus the seam allowance of course.
apparently it’s strange for such an advanced sewer to still draw the seam allowance on the fabric. in sewing class at my super expensive fashion school even the beginners were forbidden to do such a ridiculous, time-consuming thing by a certain teacher. but fuck that, this measuring & drawing the seam allowance makes it so much easier & especially accurate. anyway.
the back was very easy to cut. since the back had a straight line where the yoke would meet the bodice, i simply folded it over on that line, added the seam allowance next to the fold & started cutting on that side.

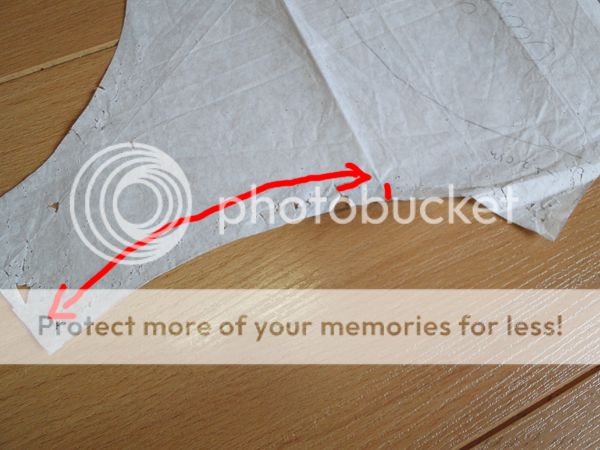
at the front folding was also involved, in a more complicated way. first i drew the seam allowance all around, until the line of where the top of the bodice would come. then the folding over. then i pinned the front bodice pattern pieces under the other pattern, measuring how far they had to be under the other pattern from the line i had traced on it earlier. i repeat: there is probably an easier, more practical way to do this. i cut right alongside the bodice pattern pieces & the rest alongside the other pattern where i had drawn the seam allowances.

then the flutter sleeves. like the skirt, you don’t really need a pattern for this. on the shirt pattern i marked where i wanted them to be.

i choose two-thirds of the armhole & doubled that length for extra flutter. on a folded piece of fabric i drew that length & at the folded part 10 cm for width & rounded that down to the end. this is what my doubled sleeve looked like:

i also cut a long rectangular piece for a finishing band around the neckline. it was about 2 cm shorter than the circumference of the neckline & 4 cm wide, with seam allowances.
sewed & serged the front & back together, again leaving the right side open for the zipper. i also topstitched at the shoulder seams, folding them to the back & sewing over from the top to keep them neatly in place.

then i did the band around the neckline, sewing it together, folding it in half & then pinned & sewed & serged it to the neckline. i also topstitched the seams here, facing inside.


(i know the lace & black make it hard to see what i actually did there)
then i made little cuts in the fabric to mark the middle of the sleeves & where they had to end in the armholes.

gathering of the sleeves followed. again the pinning in place, first the middle & edges, & then sewing & serging. when i do flutter sleeves i just fold the open part of the armhole along with the seam of the sleeves & sew that down.

now, sewing the yoke to the bodice. the back is a straight line, no challenge there, but the front. the front could take a couple of tries to get right. like with gathering, first i pinned the middle & the sides together, then the trickier curves.

you may want to loosely stitch it together by hand instead of pinning. if you’re going to do it the same way as me, don’t panic if you can’t get it perfectly smooth & fitted in the middle part where the curves meet. it will bunch. the yoke might seem too big, but it’s not. usually it’ll be fine when you sew it. after i sewed & stitched them together, i also topstitched the seam down.

all that was left to do then was insert the zipper. i hadn’t put a lot of thought in the zipper, i thought, whatever, i’ll take one from that dress i never wear. only at this point did i see it was too short for the dress i was working on. & the fabric stores were already closed. it was very frustrating at that moment, heh. i just wanted it finished. & put the tutorial up that day. this was on monday. i don’t know where i got the patience to wait until now.
anyway. when i had bought i new zipper, i loosely sewed it to the fabric from the side that would come inside, lining up the edges of the zipper and fabric. i sewed it that way until the end. as you can see, i chose to use a slightly longer zipper than required. usually i find that very handy.

then i sewed it properly by machine with a zipper foot. when you sew on an blind zipper, you have to roll the teeth back (best to do this right in front of the foot, in the picture i only had my hand so far up front because it was easier to show what i meant) & preferably stitch right on the folded line you’ll see there. don’t expect it to go exactly right the first time. it’s very easy to make a few slips or stitch too near the teeth. i had to stitch the whole length twice on one side & three on the other before my zipper was well & truly blind.

oh, & for the end on the second side, what i did was stop sewing a cm or two before the end, closed the zipper & then did the last bit by hand. while with a longer zipper it is possible to sew it all the way to the end without a zipper closure getting in your way, it is also very possible to trap your zipper closure down there. a couple of times i’ve managed to pull it out again, but generally i like to avoid that. another thing you could do is leave just a few millimeters open at the end, then you could easily pull through the closure, but that would also leave a small hole. that’s not so terrible, especially with a skirt like this, but i also rather avoided that.
as the finishing touch i sewed on a little black ribbon bow at the bust.
end of walk-through!
thank you so much if you read all those almost 2000 words! or even a part of it. i hope you learned something new. let me know if you want me to do more of these or if something was unclear. seriously, if something was unclear, please tell me. i won’t be offended. with all the things i was translating literally from dutch, it’s probable.
comments on the dress itself are also appreciated, maybe that’s all you wanted to see & you don’t care for sewing yourself. thanks either way (: