or: THE MOST FABULOUS THING I’VE EVER MADE. probably.

i’m so happy with it! i can’t wait for an excuse to wear this.

SO MUCH work & time & materials went into this. i started it the sunday before last, worked on it for four whole days straight, then one of the lenses of my glasses broke & because of all that led to, i couldn’t work on it as much as i liked for the rest of the week. i was away the weekend & then spent the greater part of the past three days on it. & now it’s finally done! i think.

it was such a massive project, i loved the whole process. i should make things like this more often.

looking at this picture, i might add some more to that side…


this whole dress started with a bra. a lovely pink one with black lace i had never worn, would never wear & couldn’t bring myself to get rid of. while i was fanatically getting rid of loads of other crap, i thought why not use it in a scrap dress i would wear? i had so many pink & black scraps i could use for it. so i went through my box of scraps & failures, to-be-reconstructed pile, the debris at the bottom of my sewing box, my accessory boxes, the bag i had just packed for the clothing bin, the suitcase of stuff i was going to sell & this was what i found:

i didn’t use all of it, but definitely most. despite how fanatically i emptied out my massive closet, there is no way in hell the finished product will fit.
one of the things i unearthed in my box of scraps & failures was half of the beginning of an ill-fitting corset. that & the bra & an atari teenage riot shirt i had forgotten about, formed the base of the bodice. i pinned them to my dressform, which is lovely & alterable & i had already set to my size. to that base i added some matching scraps, decorations & a zipper i had never used, molding it all into shape on my dressform. i almost always work with patterns drawn beforehand & that was quite nice to do for a change. thank you artemis, for introducing me to that other way of making clothes.
here are the only in-progress pictures i made:


(some of those things i removed, lots of other things were added)
at the front i only added a couple of longer pieces to flow into the skirt at that point. when it was to my satisfaction i took it off my dressform & sewed all the way over the scrappy parts to make it a whole piece. the bra part was later hand-sewn to it. quite a lot in this dress is hand-sewn, mostly in the skirt part.


then i left the top for what it was & started on the skirt part. that was the most work, of course. for those scrappy skirts you always need more than you think you do.
for the base of it i used cut pieces from an old flared pinstriped dress i made, an old poison industries dress i never wore & a pink petticoat i made with too little tulle. i’m so glad i finally found a use for that poison industries dress. i bought it in an emergency (one of the hottest april days in the history of the netherlands in a full v costume) at the elf fantasy fair four or five years ago & hadn’t worn it since. i started with a full piece of the skirt cut from it, pinning it to the back in an upwards curve. i added some more long scraps of fabric to the front.

then i cut the petticoat in half & gathered it into about half its size. it made a nice base for the other half of the skirt part. in-between & above i added parts of the pinstriped dress. then it was a long, long process of adding smaller scraps to it all. among those scraps are a black with white print bandanna i bought at some random bazaar in surinam & was a sort of signature of mine throughout my childhood & early teens, a pink polka dotted sheer scarf i got for free with a copy of cosmo girl & i had worn to death in lots of different ways when i still loved pink, the sleeves from that old laughing vampire dress & fabric samples that were too small to use for anything else. at some point i sewed together all the base parts of the skirt to make it one piece. i also added one tier from the poison industries dress to the other side & continued pinning & (hand-)sewing the scraps in co-ordinating layers.

when i was done with all that, it still seemed like something was missing at the front. so i fell back on one of my old trademarks, a bow. i made it out of the lining of an old hell bunny dress, also bought in an emergency, for a party in 2008, because i had ‘nothing to wear’, & never worn again. the painfully cute skull fabric is from that same dress.

then i went on to the top of the bodice. i bought some new lace for that, my supply was very low. it was pretty hard to find a good way to sufficiently disguise the origin of the cups, but, after looking through my inspiration folder from gibbous, i think i succeeded quite well.
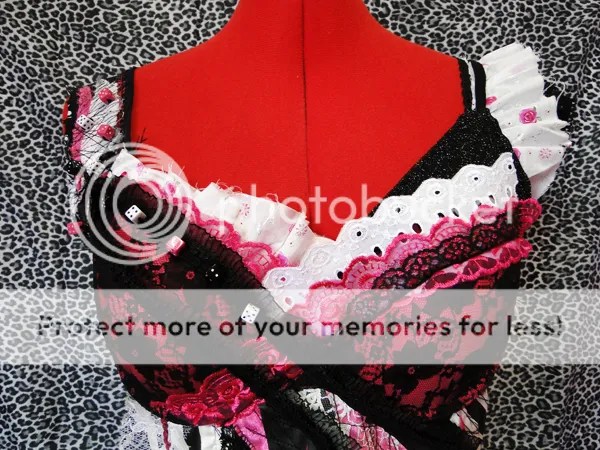


besides lace & a ruffled bit of a fabric sample i bought for that old fashion course of mine, i also used half of the top of a tank an aunt gave to me because she didn’t think she’d wear it after all. for one of the straps i used a whole strap cut from my pinstriped dress, with some scraps sewn to it at the front. for the other i first only used the elastic strap attached to the glittery top, but it looked so small & awkward next to the other one. so i added half of a garter belt bought in the wrong size & more of that fabric sample used for the front. it turned out super cute.

to top it off i added some beads to the front top. they were from a bracelet i got for my sixteenth birthday from some of my favourite people at the time, loved & wore almost every day until it tragically snapped at an arch enemy show some years later. at the back i also added another, open, zipper & one of the strange wheel things i got with my serger & never discovered the use of.
i was planning on adding lots more of those small things, but everything else i added seemed to detract from the perfection of it.

some suggestions if you want to make your own:
+ gather as many different materials as you can, at least twice as much as you think you’ll need
+ the higher quality your materials are, the higher quality of the end product
+ specifically for the skirt part: the more light, sheer, shimmery materials, the better it will look
+ also for the skirt part: don’t just bunch all the scraps together at the top, work in layers; it’s easiest to start at the bottom with these
+ the more smaller pieces you use, the better
+ for molding on a dressform: keep in mind that you’ll have to remove your clothing from it in one piece, don’t stick your pins in the body
+ preferably pin in a way that you don’t have to remove your pins & they won’t hinder you when sewing
+ more is more.
+ if you’re using clothes that still look good on its own & you’re hesitant to cut them up, just start cutting; staring at them for hours on end is not helpful
+ don’t just do some random shit, it’s better if you have some sort of base/rhythm/recurring theme
+ keep track of your pins! it’s very easy to lose them &/or get them stuck in the patchworky parts
+ use old, existing things in a completely different way
+ surprise yourself
+ feel free to change things you’ve already pinned or even sewn; our first ideas aren’t always the best
+ be patient
+ it’s better not to listen to very energetic/aggressive music when you work on it
+ if it starts to irritate you, step away, take a deep breath, have a cup of tea, go back to it at a better time
+ don’t forget to change to thicker needles for thicker parts
+ if you can’t decide between this way or that way, pin & take pictures of both & decide later
+ serge/zigzag edges where you can; you don’t want something like this falling apart on you, do you?
thanks so much for looking & reading!


